
Trending Now

These days, I’d say you’d be pretty hard-pressed to find folks who are really talented at tying knots.
Unless you work in pretty specific industries, happened to be a Scout growing up, or spend a lot of time camping and hiking… a lot of people just don’t know how to tie knots properly.
In the spirit of learning something new today (and every day, hopefully), here are instructions about how to tie 10 different kinds of knots.
Good luck!
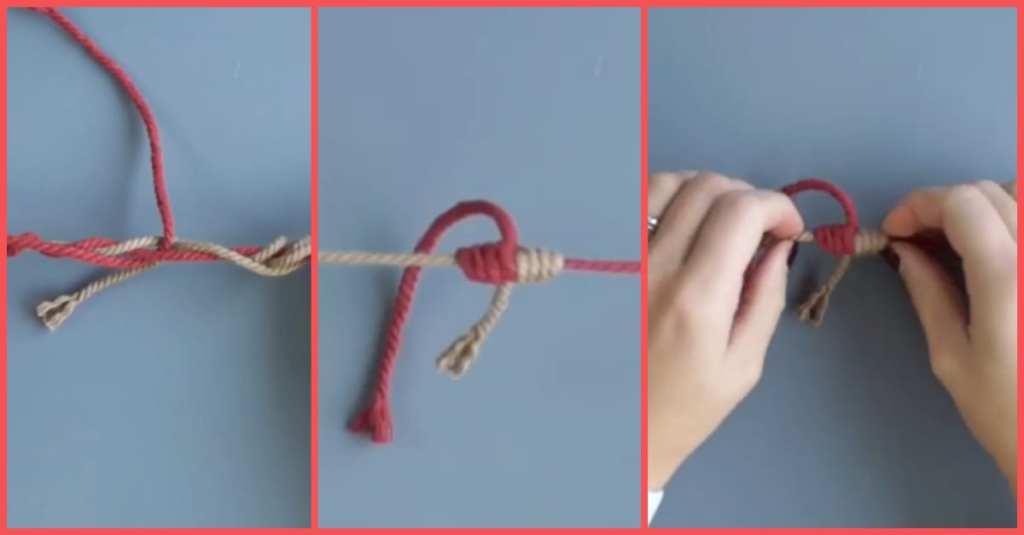
1. Prusik knot
https://www.instagram.com/p/B0YoQvYB6B8/
The Prusik knot is known as the “slide and grip” knot.
You’ll need two pieces of rope, one long and one short. Tie a loop in the short rope that has a solid knot in it like a square knot. Wrap the loop around the long rope three times and be certain that each wrap lies flat against the bigger rope.
Then pass the loop of short rope under itself and pull tight. If there is weight on the loop, the Prusik knot will grip the long rope.
You can slide the Prusik knot up and down the long rope by taking weight off of the loop pushing the wraps up or down.
2. Timber hitch
https://www.instagram.com/p/BguTxuEnYVN/
This knot secures a rope to an object, usually for hauling or to act as support.
Run the free end of a piece of rope around an object that you want to pull. Wrap the tag end of the rope five times around the inside of the loop you created.
Tighten the timber hitch so the five wraps are tight against the object you want to haul, and the tension will keep the timber hitch in place.
3. Blood knot
https://www.instagram.com/p/B7tcbKdDSMD/
This knot is used to secure two lines together.
Overlap the two ropes and wrap one free end around the other six times. Then pass the free end between the two lines.
After that, wrap the other line six times and tuck the free end back between the two lines in the opposite direction of the other free end of the line.
4. Man harness
https://www.instagram.com/p/BA8vmZpip1K/
This knot allows you to put a loop anywhere in a length of rope if neither end of the rope is free to tie a loop.
Make sure there is slack in the rope and make a loop. Make sure that part of the line runs through the middle of the loop. Take the loop and pull it through the gap between the line in the middle and the other side of the loop.
Then pull this new loop tight and pull the line to tighten the man harness knot.
Keep something in the loop to hold the knot or it will slip.
5. Carrick bend
https://www.instagram.com/p/B1zgExNljqV/
This knot forms a square that joins two different ropes together.
Make a loop with the free end of one of the ropes. Pass the free end of the other rope under the first loop and then over, and then under.
Then you need to thread the free end across the loop passing under itself and then pull on both standing ends to tighten the knot.
6. Trucker’s hitch
https://www.instagram.com/p/B7Gaol0IrSz/
This is a handy knot that can be used in many situations.
Tie a figure-eight knot with a loop in the rope. Then pass the free end of the rope around or through the object you’re attaching the rope to, and then pass it through the loop.
Pull the working end of the rope tight and then form two half hitches just below the loop.
Works like a charm!
7. Barrel hitch
You’ve probably seen this knot used in construction or on boats before. It’s been used for centuries to lift buckets and barrels in a balanced position.
Place the barrel on top of your rope. Tie an overhand knot across the top of the barrel. Open the overhand knot until it wraps around the top sides of the barrel.
Then tie the ends of the rope together to make a square knot and then lift.
8. Sheepshank
https://www.instagram.com/p/B9HQxH8HWYG/
This knot shortens a line without having to cut it, so you don’t have to waste rope.
Fold your existing rope to the length you want it to be. Create a half hitch in one end of the rope and drop it over the nearby loop.
Make a half hitch knot in the other end, drop it over its adjacent loop, and slowly tighten the whole thing.
9. Tripod lashing
https://www.instagram.com/p/BZwDobTn5a5/
This is a fun knot to make and is used a lot in camping.
Gather three poles that are nearly the same in length and thickness and lay them down side-by-side. Make a clove hitch on the end of one of the poles and wrap the rope around all three poles 4 to 6 times.
Next, wrap rope twice between each pole and work your way back to the original clove hitch you created. Tie the tag end of your rope to the tag end of the original knot you made. You can now spread the legs of your tripod and use it in your camp.
10. Square lashing
https://www.instagram.com/p/B6V5Ky8jXEg/
You can use this knot to secure two poles together.
Tie a clove hitch to one of your poles near where you want the two poles to cross. Then wrap the rope around where the two poles cross and go under the lower pole and over the top pole. Do this wrap 6 times. Now wrap between the poles, using the previous wrappings to tighten them.
To finish, use a square knot and tie the free end of the rope to the free end of the clove hitch that you started off this whole operation with. You’re done!
How many of these knots do you know how to tie?
Share with us in the comments!


